
This thing rocks! I have used an opaque projector since I was little and they really are easy and fun to use. Who wants to pay an arm load for a wall hanging decoration that you will only use once (if you are lucky twice) and really isn’t what you were looking for in the first place? Right? Well I have a solution. It just may require some getting creative on your part. If you don’t have an opaque projector you will have to use an overhead projector (come on I know you are friends with your kids teachers… they will be glad to help, plus you may be teaching them a thing o two).
Ok so start by picking your picture (black and white coloring pages work best), then if you have an opaque projector just slide the picture into the right spot. Here is the one that we used, but there are so many types that they all look VERY different (this one is from the stone age – I mean I am talking about 20 years old).

If you don’t have an opaque projector you will have to make a transparency and use an overhead.
Place your paper on the wall with a stapler (can get this at teacher stores for really cheep – it is what you use to cover bulletin boards). Move your projector to where it is a good size on the paper and what you are looking for… and start tracing… now if you are doing a character that is blue, start with blue so that you just have to do the shirts, hat, shoes, etc.
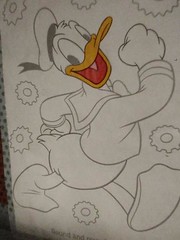
Here is Donald when shown on the projector to the paper. You can tell we had already traced his mouth on the right colors, cut them out and glued them on. It is best if you can do all the colors first and then trace the other parts after they have been glued on, that way if you mess up a little bit during cutting that your traced lines aren’t all out of whack, and you can fudge it a little.
Place your paper on the wall with a stapler (can get this at teacher stores for really cheep – it is what you use to cover bulletin boards). Move your projector to where it is a good size on the paper and what you are looking for… and start tracing… now if you are doing a character that is blue, start with blue so that you just have to do the shirts, hat, shoes, etc.
Here is Donald when shown on the projector to the paper. You can tell we had already traced his mouth on the right colors, cut them out and glued them on. It is best if you can do all the colors first and then trace the other parts after they have been glued on, that way if you mess up a little bit during cutting that your traced lines aren’t all out of whack, and you can fudge it a little.
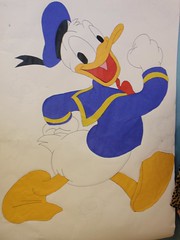
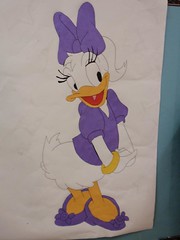
Here is the completed Donald, Daisy, & Pluto. You will notice for Donald and Daisy we started with white and Pluto we started with the light brownish color. For black areas we trace and cut those too since the sharpies or what ever black marker you are using can leave streaks. It looks much better with the finished product. After you have finished gluing together we will cut them out around the edge of the character and laminate them. We laminate them so that they are reusable at other parties instead of throwing all the hard work away. It is really fun to do these with two people!

We still have Mickey, Minnie, Clarabelle, Pete, the Mickey Mouse Clubhouse, possibly a car with the Clubhouse friends, Chip and Dale, and a couple other ones to do, but they look pretty good right! What do you think?
TTFN~
Ha! I totally make my own decorations using a projector. I think I got mine from Oriental Trading or something 'cause it is kind of cheap-o. But I LOVE to make decorations this way. (And thanks for reminding me...I have a party in two weeks and I need to find it for our decorations!)
ReplyDeleteAnjeanette
hi i was wonder what kind of paint u use to paint
ReplyDeleteIf you read this post it tells you that we use butcher paper "(can get this at teacher stores for really cheep – it is what you use to cover bulletin boards)."
ReplyDeleteLet me know if you have any other questions.
Thankyou soo much...!
ReplyDeletethis idea has helped me aaaa lot!!
You Rock !!!