Wednesday, February 24, 2010

Goofy Wall Decoration - Mickey Party Planning - Take 10

Last night I went to my mom's school and we did another wall decoration. Not only do I love the finished product, I just really enjoy working with my mom to do these. So, one more down and about 5-6 to go... we may decide to sans Pete, since he is just kind of an odd looking character that never looks happy... but we definatly want to do two Mickey Mouse Characters... so I don't know. Last night we did Goofy and he turned out just absolutly adorable.

What do you think of Goofy?

Goofy

Here is my to do list for the characters:

1. Donald Duck
2. Daisy Duck
3. Mickey Mouse
4. Minnie Mouse
5. Clubhouse
6. Claribelle
7. Pete
8. Goofy
9. Pluto
10: Door to the Clubhouse
11. Mickey and Friends in the Car
12. Toodles
13. Mickey Park

It is looking good! Have a great day!

TTFN~

Tuesday, February 23, 2010

Invitation Envelope - Mickey Party Planning - Take 9

I am a firm believer that packaging is everything. I mean, no offense to anyone who just hands out white envelopes with names written on them, or postcards with the preprinted info from a party place and handwriting in the details for the party (ie. time, date, name, etc.). I just was not raised to do this and want people to be excited about what they are opening!

Below is a picture of this years invitation envelope (this is a sample - hence Laci's name in the middle and our address missing from the upper left). As you can see I did the Mickey park bubble picture in the bottom left and the Mickey Mouse Clubhouse logo on the bottom right. These were printed on a laserjet printer and are cute, pretty, and perfect for the theme. Inside is the picture of the birthday girl, a page with directions to our house (made this two years ago in Microsoft Publisher and just print them out every year), and the invitation. They were sticker closure envelopes so all I had to do was rip off the backing of the sticker and press it down to close.

Invite Envelope

What do you think of the envelope? Perfect right!

Hope you have a great Tuesday!

TTFN~

Monday, February 22, 2010

Invitation Picture - Mickey Party Planning - Take 8

Ok, so with 33 days left until Laci's party I am a stone throw away from handing out the adorable invites, and still have lots to do! This weekend I feel like I got so much shopping and other things done for the party, but then when I got home with all the bags was like... ok, what did I do all day (I do mean ALL day!).

I do realize that when I payed for the balloons that I didn't get to take them home with me, so that was kind of a bummer. However, in the past we have always gotten those little tanks and (1) they don't do many balloons, (2) you have to do them, and (3) they fell so fast! So I payed to get 4 dozen balloons and 3 of each mylar Mickey/Minnie heads. I know I am spending more on this than last year, but they will be a LOT nicer and stay up much longer! Plus, I can send one home with each kid!

One thing that I did get done was get the picture of Laci in her BD outfit done to send with her invitations. Her eyes were a little squinted, but for the most part it was an adorable picture! She was a trooper even though she had no sleves and it was a little chilly outside. I went and got 65 of these printed off and (1) 20x24 poster to hang on the wall. The lady at the counter was like 65 of the same picture? Yes! I am crazy! Now we want to go back and do last years as a poster, that is how well it turned out! Then we can have one for each year in the family room upstairs.

I was talking to a parent at the birthday party yesterday about knowing which kids party you are going to (I really wasn't sure that this particular Chase, was the Chase I was thinking of <-- it was, but still I wasn't sure until we got there)... I mentioned that I put a picture with the invite so that you know exactly which kid is having the party. They just thought that was such a good idea. I mean a lot of people probably think I am nuts at first, but then once they give it a thought are like... well that's a really good idea. Anyways, here is the picture we took. I think she is the cutest little button in the world (I am only slightly partial... ok a LOT partial)! But she is pretty adorable!


What do you think about sending a picture with the invite? Crazy or Not Crazy? Also what do you think about the picture I am sending with the invite?

TTFN~

Monday, February 15, 2010

More Party Decorations - Mickey Party Planning Take 7

There are so many things to get done before Laci's party! Only 40 days until the party!

Here is the list of characters that are going to be done for the wall decorations. The ones with lines through are completed! Yippie! Only 5 more smaller ones and then the 1 big one (the car)... this will take forever!!!! But that one we will do last!

1. Donald Duck
2. Daisy Duck
3. Mickey Mouse
4. Minnie Mouse
5. Clubhouse
6. Claribelle
7. Pete
8. Goofy
9. Pluto
10: Door to the Clubhouse
11. Mickey and Friends in the Car
12. Toodles
13. Mickey Park

Here are the recent ones that we did last week.... oh, and what do you think about my fancy pictures scrolling? Nifty huh!


Above are Minnie, the Clubhouse, and The Clubhouse Door (for our front door).

Minnie took so long because of all the polka dots, but she turned out super cute!

Have a great week!

TTFN~

Thursday, February 11, 2010

Texas is Bi-Polar

I think someone forgot to tell Texas that they are in the south and that it should be warmer!


I decided against driving into work today because there are reports that it is supposed to get worse and ice on some of the bridges and overpasses throughout the day. Tomorrow morning is supposed to be worse because of stuff freezing, but then the ice is supposed to melt and it will be ok to drive later. So for todya and tomorrow morning I am just going to curl up with some warm blankets and think about the 100 degree days we will have soon enough..

TTFN~

Wednesday, February 10, 2010

Mickey Mouse Valentines

So I tried to take a lead from Misty over at Creative Itch, but it didn't go so hot... so I modified... Hers was just so cute with the scallops, but I didn't have anything to make that, so I improvised.

Here is her Valentine...


Here is my Valentine (front)...


I gave up on trying to make a cute card to put it on and got (1) box of 32 mickey valentines for $2. I used the clear gift wrap tape to adhere the pixie stix to the card and used clear tape to adhere the candy to the Mickey Mouse head. Those were fun to do with my new Cricut cartridge and then using a circle punch to cut out the center. I printed off a sheet of the circles with the Mickey and Minnie Design and then used the circle punch to cut them out.

Here is the back...


I didn't like how the back said to and from on it. I mean the kids are 2, can't read anyways and they will be demolished in less than 2 minutes. Taking that into account I really didn't want to spend more time on them, so instead of filling out the back or leaving it blank, I am putting these on the back.

In comparison, hers totally outshine mine, but it's ok. I gave it a shot, and at least they are themed to prelude for the party. I will be making some for the party, I am just not going to have anything on the bottom of the stick, just the Mickey head with a circle in the middle that will have all different sayings and logos.

TTFN~

Tuesday, February 9, 2010

Cheap & Easy Party Decorations! – Mickey Party Planning – Take 6

Ok, so I am going to share my favorite piece of old equipment of all times! The opaque projector! (Here is where the trumpets go bah, bah da da dun dun dun dun dun dun daaaaaaaaa!!!!!!!!!)

This thing rocks! I have used an opaque projector since I was little and they really are easy and fun to use. Who wants to pay an arm load for a wall hanging decoration that you will only use once (if you are lucky twice) and really isn’t what you were looking for in the first place? Right? Well I have a solution. It just may require some getting creative on your part. If you don’t have an opaque projector you will have to use an overhead projector (come on I know you are friends with your kids teachers… they will be glad to help, plus you may be teaching them a thing o two).

Ok so start by picking your picture (black and white coloring pages work best), then if you have an opaque projector just slide the picture into the right spot. Here is the one that we used, but there are so many types that they all look VERY different (this one is from the stone age – I mean I am talking about 20 years old).


If you don’t have an opaque projector you will have to make a transparency and use an overhead.

Place your paper on the wall with a stapler (can get this at teacher stores for really cheep – it is what you use to cover bulletin boards). Move your projector to where it is a good size on the paper and what you are looking for… and start tracing… now if you are doing a character that is blue, start with blue so that you just have to do the shirts, hat, shoes, etc.

Here is Donald when shown on the projector to the paper. You can tell we had already traced his mouth on the right colors, cut them out and glued them on. It is best if you can do all the colors first and then trace the other parts after they have been glued on, that way if you mess up a little bit during cutting that your traced lines aren’t all out of whack, and you can fudge it a little.


Here is the completed Donald, Daisy, & Pluto. You will notice for Donald and Daisy we started with white and Pluto we started with the light brownish color. For black areas we trace and cut those too since the sharpies or what ever black marker you are using can leave streaks. It looks much better with the finished product. After you have finished gluing together we will cut them out around the edge of the character and laminate them. We laminate them so that they are reusable at other parties instead of throwing all the hard work away. It is really fun to do these with two people!


We still have Mickey, Minnie, Clarabelle, Pete, the Mickey Mouse Clubhouse, possibly a car with the Clubhouse friends, Chip and Dale, and a couple other ones to do, but they look pretty good right! What do you think?

TTFN~

Friday, February 5, 2010

An Angel was Watching Over Me

Yesterday morning while on my way to work I spun out due to the car in front of me slamming on their brakes. I crossed 3 lanes of traffic and my car ended up resting with out a scratch on it on the shoulder with the two left tires on the concrete and the two right tires on the grass going down into the ditch. My car wouldn't start because it was in shock and frankly so was I. The hubby took a personal day and came out to me. After my car was jumped we went out to Jake's uncles shop and had my car looked at. It is a miricle, but it was fine just got a small alignment adjustment. When people say miricles don't happen.... I disagree! That black truck coming at me that managed to swerve out of the way and not hit me was a miricle, not hitting the concrete barrier (below in yellow) was a miricle... that would have pinged me back into traffic. I don't know what to say except for, as bad as the last 24 hours were, it is a miricle that not only am I ok, but my car is ok, and that I am here. Below is the shot of the highway. I was about where the red car was or a little before that and my car ended up resting where the light blue one is on the shoulder.


Let me just hope this doesn't happen ever again. It was a terrifying experience I wish not to relive. Have a safe and happy weekend!

TTFN~


Tuesday, February 2, 2010

Mickey Party Planning - Take 5

Like Mickey Party Planning - Take 4, I just have to have a cute little banner hanging from the fireplace. I got my inspiration from Inspiring Creations from her XOXO rag garland. So after I finished my Mickey wreath I started by painting my letters. I got these letters which came (2) to a package for like 99 cents. It wasn't to terribly bad for price. Then I bought red white and black paint. Guess what I did next? Yup, painted them super cute!


What do you think of how they turned out? The LACI is going to go in the middle of the wreath, and if I decide not to be lazy and go buy one more I (the cursing that came out when I realized I was one letter short lasted for at least a couple minutes) then I will do HAPPY BIRTHDAY LACI on the banner too. For now here are the letters. They turned out pretty stinkin cute!


Have a great day!

TTFN~

Monday, February 1, 2010

Mickey Party Planning - Take 4

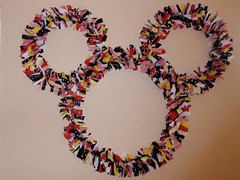
54 days and the planning has not stopped! So I needed something for over the fireplace. Lets just say the wreaths I have that are pretty are my Christmas one, my Thanksgiving one, and my 4th of July one. So I REALLY needed something inexpensive, and CUTE! Everything I do is cute (at least I think so)! So this is a picture of what I made. I know it may not look like much from this picture, but you will get the big picture in a minute.


So I started off with these wire hoops. I got one big one (pictured below) and two a little bit smaller than that.


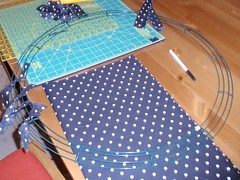
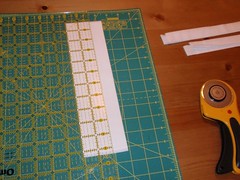
I used my cutting board, rotary cutter, and ruler thing (sorry I don't know what it is called, but it is the clear thing with yellow markings). I took the fabric and cut 1" x 7" strips. Each 1" strip cut 6 pieces of 1"x 7" fabric. So (2) 1" strips of 6 types of fabric did three sections on the wire.


Here is a close up of the very first section I tied on. It just turned out adorable. Now to get the two smaller hoops to stay on, I used the floral wire to connect them at a joint. I should have taken a picture, but I guess I can still take a picture of the back if anyone wants to see how I did it. Just let me know and I will post a picture. So the (2) smaller hoops cost $2.47 each and the larger one about $4.00 (sorry I can't find the tag or my receipt). So about $9.00 for the frame. Then about 3 yards of fabric (I know it took a little more than 1/2 a yard of each of the 6, so being safe I would get 4 1/2 yards of fabric). I had gotten 6 yards because I am doing another project similar to this that I will be sharing. So total the project is based on the fabric deals you get. But if you are a bargan shopper you could probably have done this for around $20.00.


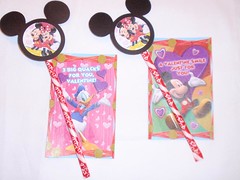
What do you think? Laci just loves it and calls it her Mickey Mouse clubhouse... This is a picture more for size than detail. It is huge! It goes from 2" below the ceiling to 2" above the mantle. My screw was too high to hang it there and take a picture, but my picture frame was in a perfect spot, so I used it's nail.


I am totally planning on making the large center wreaths for other holidays because it is just super cute. If I did it for other ones I would fill up more than one ring, but for this project one ring all the way around was fine.

I look forward to hearing what you think. Have a GREAT week!

TTFN~